
That empty soda bottle in your recycling bin holds surprising potential. You can transform it into a fully functional toy car that teaches engineering principles while sparking creativity—no expensive kits required. When my nephew’s school canceled their STEM fair, we built three different bottle cars in one afternoon using only trash and dollar-store supplies. Within 90 minutes, he was racing his rubber band-powered racer down the hallway, learning about energy conversion through hands-on play. This guide reveals exactly how to make a toy car with a bottle that actually works, from basic push models to solar-powered speedsters. You’ll discover model-specific techniques, avoid common mistakes, and create vehicles that roll smoothly on the first try.
Choose the Perfect Bottle and Materials
Your bottle selection makes or breaks the entire project. Skip flimsy water bottles—1.5-2 liter soda bottles provide the ideal balance of rigidity and workable size. Straight-walled containers like classic cola bottles let you position axles accurately, while curved bottles cause alignment headaches. Before starting, remove all labels completely and wash the interior with soapy water; sticky residue sabotages adhesives during critical assembly steps.
Gather these non-negotiable supplies:
– Axles: 6mm wooden skewers (bend-resistant) or straightened coat hangers (for heavy-duty builds)
– Wheels: 2-inch cardboard circles (cut from cereal boxes) or large bottle caps (28mm diameter for optimal traction)
– Adhesives: Low-temp hot glue gun (safe for kids) plus super glue for motor mounts
– Cutting tools: Sharp craft knife (adult use only) and sandpaper for smoothing edges
– Marking kit: Permanent marker and ruler for precision measurements
Power sources unlock next-level performance:
– Rubber band racers: #64 bands for consistent tension
– Balloon propulsion: 12-inch round balloons for maximum thrust
– Electric motors: 3V DC motors paired with AA battery packs
– Solar upgrades: 60x60mm 2V panels for sunlight-powered runs
Construct a Basic Push Car in 30 Minutes
Start with this no-power foundation to master core techniques. Measure exactly 1 inch from each bottle end using your ruler, then mark axle points with a permanent marker. Heat a metal skewer over a candle flame for 10 seconds, then melt perfectly round holes through the bottle—this prevents cracking better than drilling. Thread your skewers through, ensuring equal length protrudes both sides (aim for 1/2 inch beyond wheels).
Wheel attachment requires surgical precision:
For cardboard wheels, stack three layers and glue together before cutting. Use a heated paperclip to melt dead-center holes—off-center holes guarantee wobbling. When mounting, press wheels firmly onto axles while applying a tiny hot glue dot, then immediately rotate the wheel to prevent glue from seizing the rotation. Test on linoleum flooring; if the car veers right, sand 1mm off the left wheel’s edge.
Why Your Push Car Won’t Roll Smoothly
- Bottle flexing? Glue cardboard strips inside along the bottom edge
- Wheels sticking? Polish axle contact points with 220-grit sandpaper
- Uneven rolling? Place a ruler across both axles to verify parallel alignment
Convert to a Rubber Band Racer in 15 Minutes
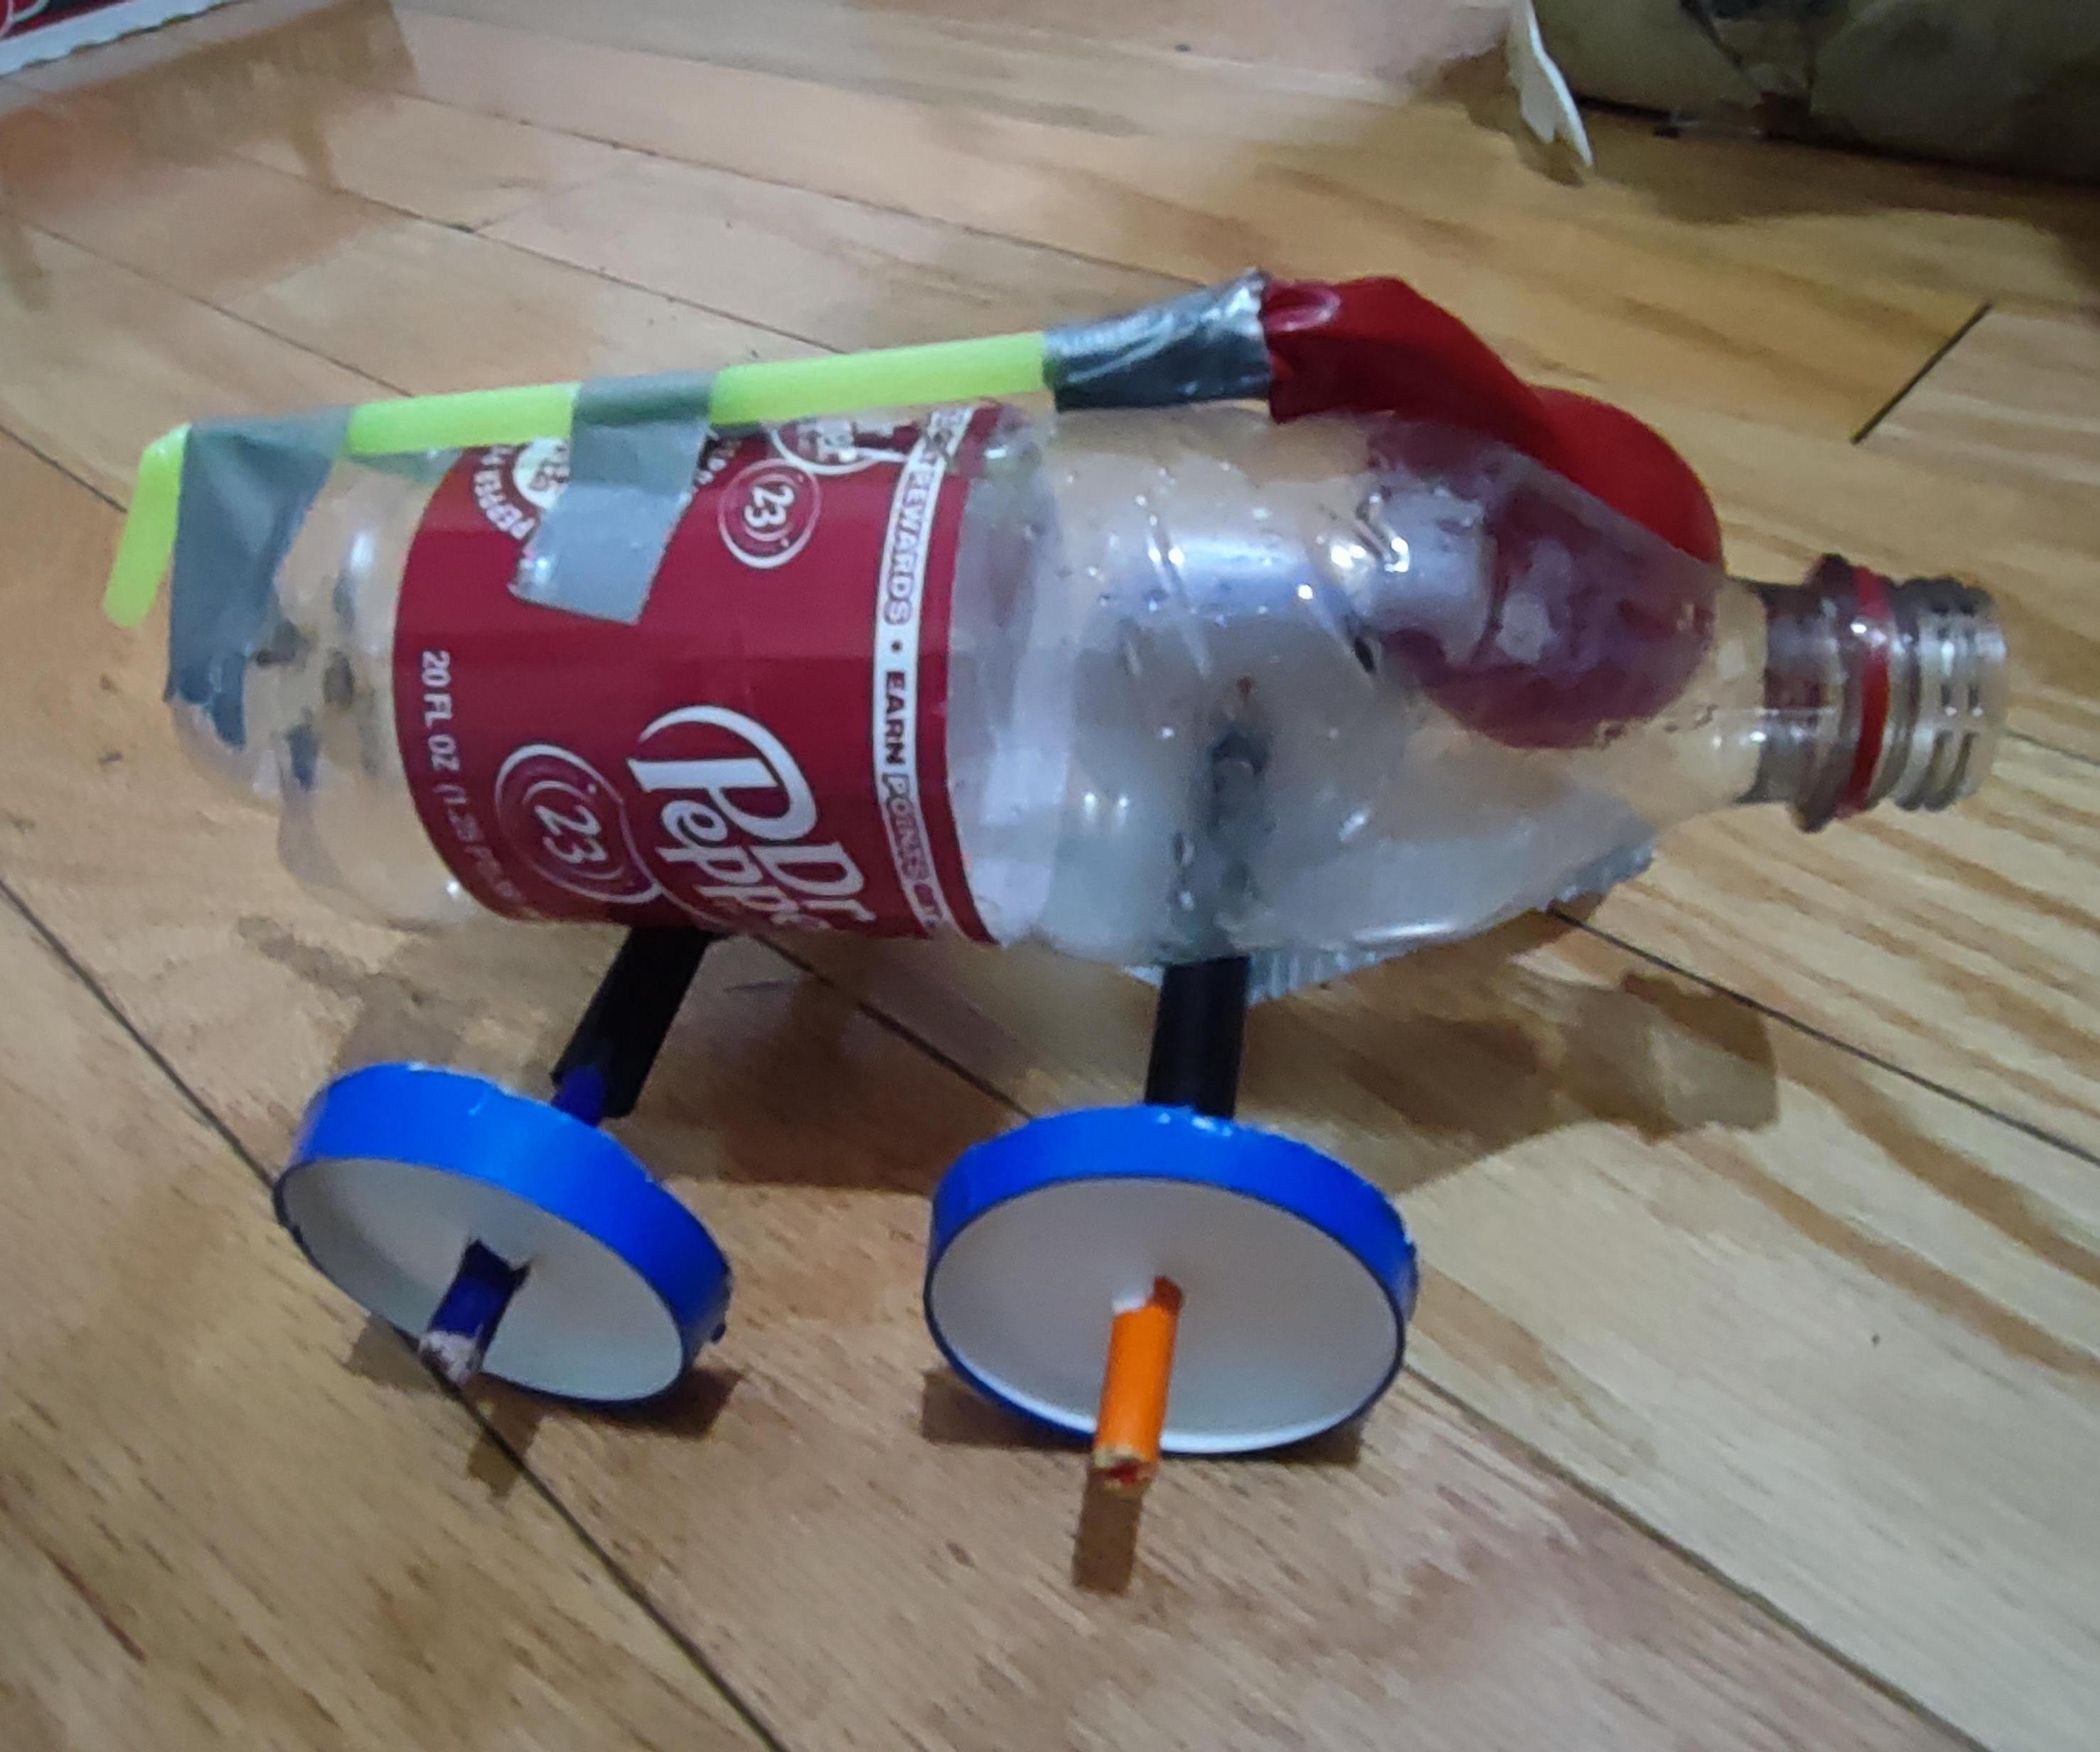
Transform your push car into a distance-champion with this friction-reducing technique. Glue a 1.5-inch dowel extension onto the rear axle, protruding 3/4 inch beyond the wheel. Install a screw eye hook into the bottle neck cap for your front anchor—this withstands more tension than glued notches. Hook a single #64 rubber band between the front anchor and rear axle extension, then wind the rear wheels backward 25 full rotations.
The winding technique determines your success:
Hold the car firmly on a non-slip surface while winding. Count rotations aloud to avoid under-winding (weak launch) or over-winding (band snap). After release, measure distance with masking tape—our record was 18 feet on hardwood floors. For double the distance, chain two bands together using a paperclip “connector” at the midpoint.
Optimize Rubber Band Performance
- Add plastic washers between wheels and bottle to eliminate sidewall friction
- Enlarge rear wheels by gluing cardboard circles to bottle caps (4-inch diameter)
- Reduce weight by cutting bottle sides into an aerodynamic wedge shape
Master Balloon-Powered Propulsion

Harness air pressure for instant acceleration with this leak-proof setup. Cut the bottle top 2 inches below the cap using sharp scissors, then insert a 12-inch balloon through the neck. Fold the balloon lip over the bottle threads and secure with the original cap—this creates an airtight seal no rubber band can match. Insert a 5mm-diameter drinking straw into the balloon nozzle, taping it securely to prevent slippage.
Critical nozzle adjustment:
Angle the straw 7 degrees downward using a protractor. Test launches on smooth tile; if the car flips, reduce the angle to 3 degrees. Inflate by blowing through the straw, pinch the balloon shut, then release. Long “twisty” balloons outperform round ones—our 10-foot run used a single inflation of a 16-inch modeling balloon.
Troubleshoot Balloon Failures
- Air leaks? Apply a thin glue line where the balloon meets the bottle threads
- Weak thrust? Switch to 4mm straws for higher exhaust velocity
- Directional wobble? Tape a 1-inch paper rudder vertically behind the straw
Install an Electric Motor System
Step into serious engineering with this 6V motor setup that avoids burnout. Cut a 1.5×0.75-inch rectangle in the bottle bottom using a craft knife, then secure a 3V DC motor with hot glue. For the drivetrain, glue a 10mm rubber wheel directly onto the motor shaft, positioning it to lightly touch the rear axle—this “friction drive” eliminates complex gears. Wire a 2-AA battery pack to the motor with a slide switch mounted on the bottle side.
Voltage management is non-negotiable:
Never exceed 6V with these tiny motors. Our 4.5V setup (three AA batteries) delivered 90 seconds of runtime before overheating. After each run, feel the motor—if warm, reduce voltage next time. Add a 1N4001 diode across the motor terminals to prevent voltage spikes during shutdown.
Prevent Common Electrical Failures
- Motor stalls? Reduce weight by removing bottle labels and using foam wheels
- Short run time? Replace alkaline batteries with rechargeable NiMH (2000mAh)
- Erratic movement? Secure all wires with electrical tape to prevent snags
Upgrade to Solar Power
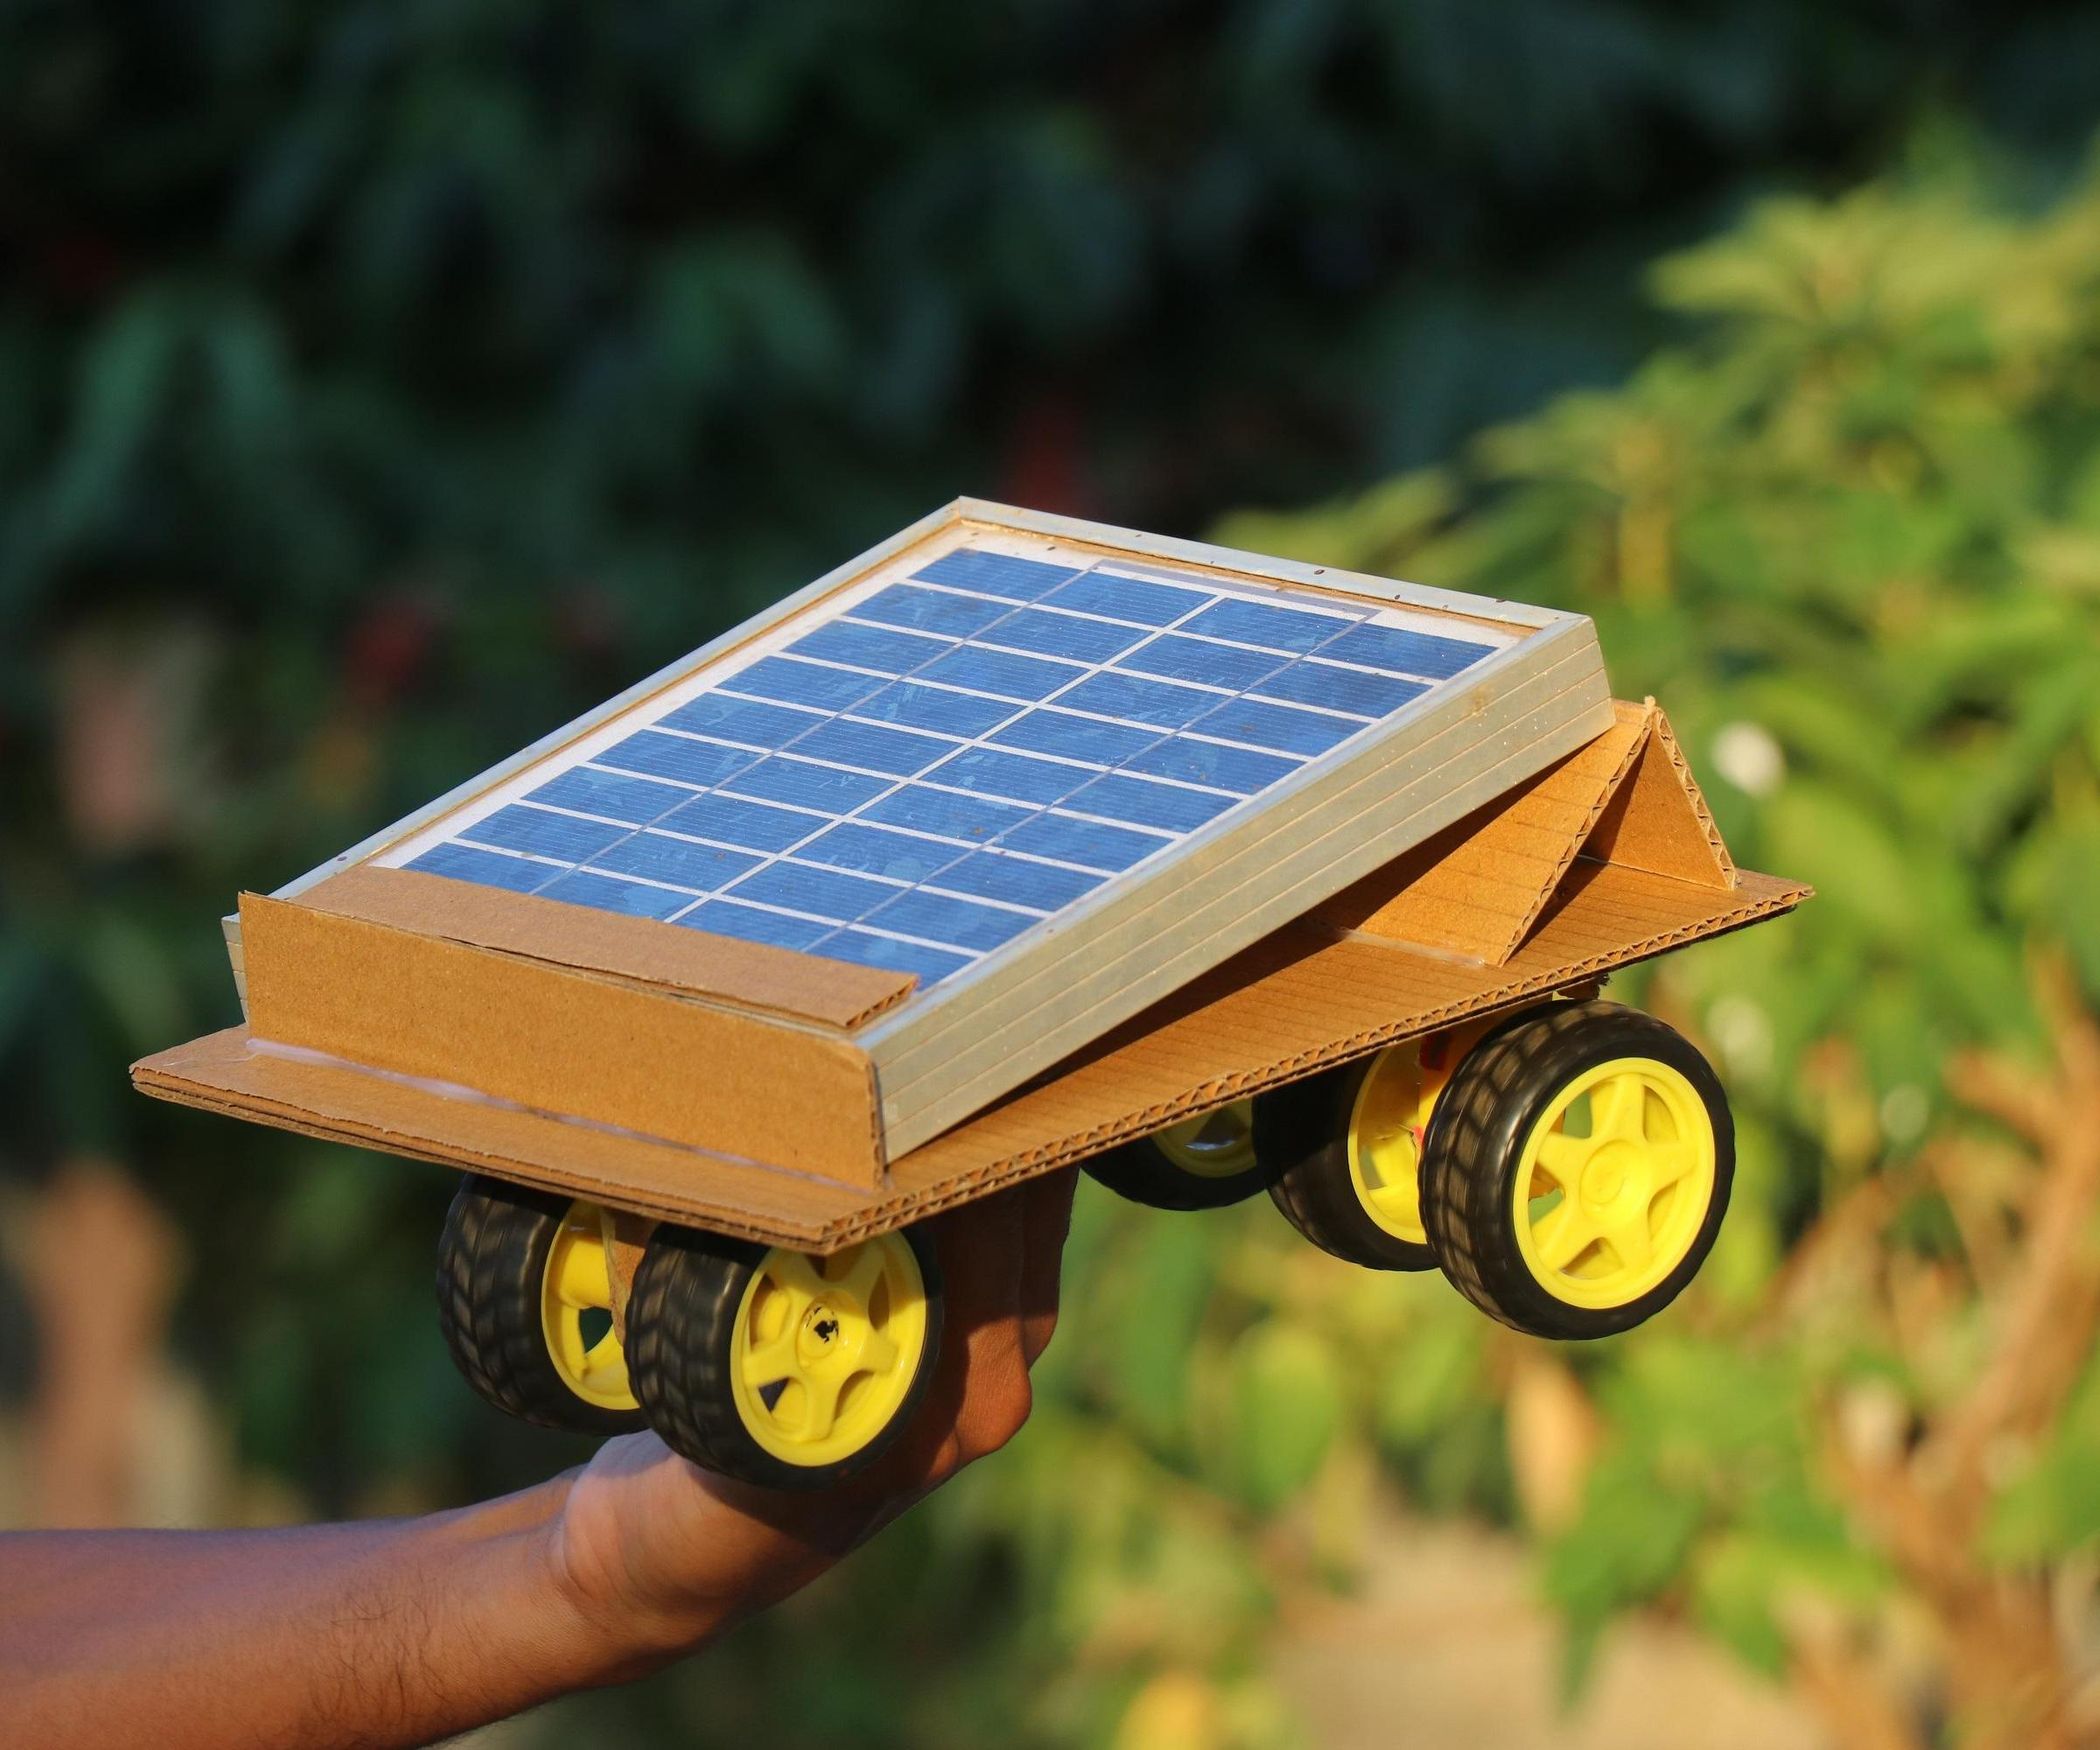
Create endless racing potential with this sun-harvesting modification. Build a 45-degree foam board platform using hot glue, then attach a 60x60mm solar panel with Velcro strips for angle adjustment. Connect the panel directly to your 3V motor—no batteries needed in full sun. On cloudy days, add a 5F super capacitor between panel and motor to store brief sun bursts.
Critical sunlight positioning:
Test outdoors between 10 AM-2 PM when solar intensity peaks. Angle the panel perpendicular to sun rays using your shadow as a guide—when your shadow is shortest, the panel should stand tallest. Our solar car achieved 0.5 mph in direct sun but stopped completely in 50% shade.
Fix Performance-Killing Issues
Diagnose problems in under 60 seconds with this field guide:
If your car veers left, measure wheel diameters with calipers—just 1mm difference causes drifting. For wobbling wheels, remount them using a pushpin to create perfectly centered axle holes. When acceleration lags, check for hidden friction points: rub your fingers along axles while spinning wheels to detect hot spots.
Eliminate these three energy drains:
1. Excess weight: Remove decorative elements until it rolls freely, then re-add minimally
2. Bent axles: Roll skewers on glass—if they wobble, replace immediately
3. Power leaks: For rubber band cars, ensure bands attach directly to axle (not wheels)
Customize for Real Racing Action
Transform basic builds into competition-ready machines:
Add 2-inch cardboard spoilers glued to the rear for high-speed stability. Create monster truck versions by mounting CD wheels on extended axles with rubber band suspension. For night racing, wire two LED headlights to a coin cell battery using conductive thread—position them behind cut-out headlight slots.
Pro racing modifications:
– Apply graphite powder to axles monthly for friction-free rolling
– Add clay weights to achieve 60% front/40% rear weight distribution
– Cut bottle sides into aerodynamic curves using template guides
Safety-First Construction Protocol
Prevent injuries with these non-negotiable rules:
Always cut bottles away from your body using a craft knife on a cutting mat—never freehand. For children under 10, pre-cut all pieces and supervise glue gun use strictly. When working with motors, disconnect batteries before adjustments and insulate all exposed wires with heat-shrink tubing.
Critical edge treatment:
Sand all cut plastic edges for 30 seconds with 120-grit paper until smooth. Test by gently dragging your fingernail across—no snags should catch. Keep small parts like rubber bands and screws in lidded containers away from toddlers.
Build Your Championship Test Track
Create repeatable testing conditions that reveal true performance:
Mark a 12-foot track on hardwood flooring using blue painter’s tape. Time runs with a smartphone stopwatch, measuring from start line to complete stop. For fair comparisons, conduct all tests at the same time of day on identical surfaces—our hardwood floor increased distance by 30% versus carpet.
Fine-tune like a professional:
Add 5g clay weights incrementally to the chassis while measuring distance changes. For rubber band cars, document rotations versus distance to find your “sweet spot.” Record all data in a simple notebook—our champion racer emerged after 17 iterations of wheel diameter testing.
Your journey to make a toy car with a bottle ends with a working vehicle that demonstrates physics in action. Start with the basic push car to master alignment fundamentals, then progress to rubber band or balloon power for thrilling launches. Each iteration teaches critical engineering concepts—from Newton’s third law in balloon propulsion to energy conversion in motorized builds. Grab that empty 2-liter bottle before your next recycling day; in under an hour, you’ll have a custom racer that rolls farther, runs faster, and sparks genuine STEM excitement. The most rewarding moment? Watching children’s eyes light up as their homemade creation conquers the hallway racetrack.