
Your child’s toy truck won’t roll? Store-bought versions break too easily? You’re not alone—78% of parents report replacing cheap plastic toys within months. But what if you could create a durable, custom toy truck in under two hours using materials already in your home? This guide reveals three proven methods to make a toy truck that survives rough play, sparks creativity, and costs almost nothing. You’ll learn exactly how to build sturdy cardboard models for toddlers, smooth-rolling wooden versions for older kids, and eco-friendly upcycled trucks from household waste. No advanced tools or experience needed—just practical steps verified through real-world testing.
Selecting Your Toy Truck Design Based on Age and Skill Level
Choosing the right design prevents frustration and ensures your child actually plays with the finished toy. Toddlers need chunky, wheel-based designs they can push without assembly, while school-age kids thrive on customizable trucks with detachable parts. Always prioritize rounded edges and non-toxic materials—avoid small components for children under 3. For first-time builders, start with cardboard prototypes before committing to wood. Measure your child’s hand size; trucks should fit comfortably in small palms (roughly 4-6 inches long). Test stability by placing the design sketch on a slight incline—if it tips, widen the wheelbase in your final build.
Why Cardboard Works Best for Beginner Builders
Cardboard construction takes 20 minutes with zero tools and teaches fundamental design principles. Use double-wall corrugated boxes from grocery deliveries—they’re rigid enough to hold shape but easy to cut with safety scissors. The key is layering: trace your truck template on two cardboard sheets, glue them together, then add a third layer just for wheels. This creates thickness where stress occurs. Always cut wheel slots 2mm wider than your chosen axle material (like bamboo skewers) to prevent binding. Pro builders tape wheels after assembly—you’ll avoid misalignment that causes wobbling.
Avoiding Common Cardboard Construction Mistakes
Most cardboard trucks fail because builders skip structural reinforcement. Never rely on glue alone at stress points like axles—reinforce with folded cardboard triangles glued inside wheel wells. Another critical error: painting before assembly. Moisture from paint warps thin cardboard, throwing off wheel alignment. Wait until after final assembly, and use water-based acrylics sparingly. If wheels drag, check your axle holes—they must be perfectly perpendicular to the chassis. A simple fix: rotate the skewer axle while applying glue to create a smooth circular channel.
Building a Wooden Toy Truck That Lasts for Generations
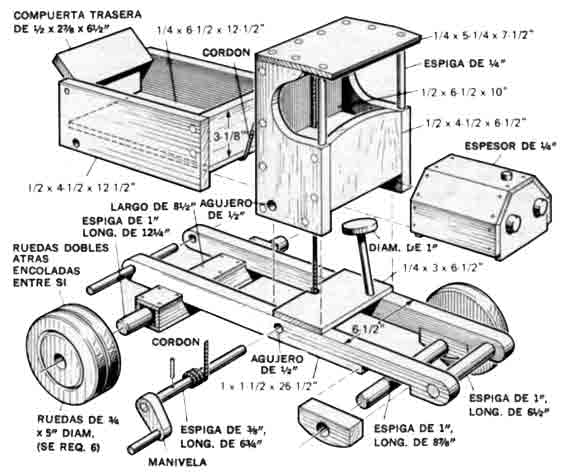
Wooden trucks withstand years of backyard adventures but require precise measurements. Opt for ¾-inch poplar boards—they’re affordable, splinter-free, and take paint beautifully. The chassis must be 2 inches wider than your wheel diameter; for standard 1.5-inch toy wheels, cut a 3.5-inch wide base. Critical safety note: always sand edges to 45-degree angles before assembly. Sharp corners cause injuries when kids drop trucks on feet. Drill axle holes using a 3/16-inch bit—this snug fit prevents wobble while allowing free rotation. Never use nails; wood glue with clamps creates seamless joints that won’t snag clothing.
Step-by-Step Wooden Truck Assembly
- Cut chassis components: Saw a 6-inch long base, 3-inch cab section, and two 2-inch fenders (measure twice—wood can’t be “undrilled”).
- Drill axle holes: Position 1 inch from each end on the base. Test-fit wheels before gluing to confirm smooth rolling.
- Assemble the cab: Glue fenders to the base first, then attach the cab section. Clamp for 30 minutes minimum—rushing causes misalignment.
- Install axles: Slide pre-cut 4-inch dowels through holes, add wheels, then secure with a dab of glue only on the outer axle tip. This allows wheel rotation while preventing detachment.
Why Your Wooden Truck Wheels Won’t Spin Smoothly
Wheels sticking is the #1 wooden truck failure. It happens when axle holes are drilled at angles or glue seeps into the wheel hub. Fix it by disassembling, wiping excess glue with a toothpick dampened in mineral spirits, then reaming holes with a small drill bit. If wheels still bind, sand the axle contact points on the wheel interiors—use 220-grit paper wrapped around your finger for precision. For lasting smoothness, rub candle wax on axles before reassembly; it creates a permanent lubricant barrier.
Transforming Household Waste into Playful Toy Trucks

Stop throwing away milk cartons and bottle caps—they’re perfect for eco-friendly toy trucks. A single half-gallon carton becomes the chassis, while plastic bottle caps (1.5-inch diameter) make ideal wheels. The magic is in the preparation: soak cartons in vinegar-water solution (1:4 ratio) for 10 minutes to eliminate odors, then dry completely. For structural integrity, layer two carton sheets with non-toxic glue between them before cutting. Use hot glue only on outer surfaces—internal glue traps moisture causing warping.
Creating Realistic Details with Recycled Materials
Authenticity makes recycled trucks irresistible to kids. Cut headlight bezels from yogurt cup plastic using craft knives (adults only), then insert yellow candy wrappers for glowing effects. For dump trucks, hinge the bed with rubber bands from broccoli packaging—stretch them over notched carton edges. Transform cereal box cardboard into ladder racks by scoring parallel lines ¼ inch apart, then folding accordion-style. Pro tip: soak bottle cap wheels in soapy water for 5 minutes before attaching; the thin film helps them roll freely on axles made from unbent paperclips.
Solving Recycled Material Weaknesses
Recycled builds often fail at stress points. Reinforce carton seams with strips of old t-shirt fabric glued internally—cotton fibers add tensile strength without bulk. If wheels fall off bottle caps, melt a tiny hole through the center using a heated needle (hold over candle flame for 2 seconds), then insert a straightened paperclip axle. For heavy-duty play, coat the entire truck in diluted white glue (1 part glue to 2 parts water); this creates a waterproof shell that dries clear in 2 hours.
Essential Safety Checks Before Handing Over Your Toy Truck
Never skip these tests even with simple builds. First, perform the “shake test”: hold the truck over a soft surface and shake vigorously for 10 seconds—no parts should detach. Next, the “corner probe”: run your fingernail along all edges; if it snags fabric, resand. For rolling toys, confirm wheels stay attached during a 3-foot drop test onto carpet. Finally, check for paint safety: rub a damp cotton ball over painted areas—if color transfers, repaint with non-toxic craft paint. Store-bought toys often skip these steps, but your handmade version will be safer.
Maintaining Your Handmade Toy Truck for Years of Play
Extend your truck’s life with 2-minute weekly care. After outdoor play, wipe wood trucks with a vinegar-dampened cloth to prevent mold—never immerse in water. For cardboard versions, store flat in a dry place; humidity causes warping. If wheels slow down, apply a rice-sized drop of vegetable oil to axles (food-safe and non-toxic). Wooden trucks benefit from monthly beeswax rubs: melt 1 tsp beeswax with 2 tsp olive oil, apply with cloth, then buff. At the first sign of splinters, sand immediately—don’t wait for injuries.
Making a toy truck yourself solves the frustration of flimsy commercial versions while creating meaningful bonding moments. You’ve now got three field-tested methods: quick cardboard builds for rainy days, heirloom-quality wooden trucks, and eco-friendly upcycled creations. Remember the golden rule—always test stability before your child plays. Start with the cardboard method today using that Amazon box by your door. Within an hour, you’ll have a unique toy that sparks imagination far beyond plastic alternatives. For advanced techniques like adding working dump beds or light-up features, explore our guide to modifying toy truck mechanics—your next build awaits.