
Struggling to wrap a toy truck for a birthday or holiday gift? You’re not alone. Unlike standard boxes, toy trucks with their wheels, cabs, and trailers create frustrating wrapping challenges that leave most gift-givers with torn paper and messy folds. A survey of 500 gift-givers found that 78% considered irregularly shaped toys the most difficult items to wrap properly. The good news is that with the right techniques, you can transform your toy truck gift from haphazard to holiday-perfect in under 20 minutes. This guide reveals professional gift-wrappers’ secrets for achieving clean folds, secure seams, and beautiful presentation on even the trickiest toy trucks.
Essential Supplies for Wrapping Toy Trucks
Before you begin, gather these specific materials designed for irregular shapes. Standard wrapping supplies often fail with toy trucks, so select items that provide flexibility and durability.
Select Flexible Wrapping Paper
Choose medium-weight wrapping paper with some give—it should bend without creasing permanently. Heavy kraft paper works well for larger trucks, while metallic or patterned papers effectively hide minor imperfections around wheel areas. Ensure your paper width exceeds the truck’s circumference by at least 8 inches to allow for proper folding. For a 12-inch toy truck, start with paper at least 20 inches wide.
Specialty Tape Solutions
Keep three tape types on hand: standard clear tape for hidden seams, double-sided tape for visible surfaces, and washi tape for decorative repairs. A tape dispenser with a sharp blade ensures clean cuts around complex shapes. Professional gift-wrappers recommend 3/4-inch wide tape—it provides enough adhesion without being bulky.
Precision Cutting Tools
Standard scissors work for straight cuts, but add small detail scissors (like nail scissors) for navigating around wheels. A ruler helps measure consistent overhang on all sides, while a bone folder creates sharp creases without tearing delicate paper. These specialized tools prevent the frustration of tearing paper at critical points.
Prepare the Toy Truck for Wrapping
Proper preparation prevents 90% of wrapping disasters. Follow these specific steps to ready your truck before applying any paper.
Secure All Moving Parts
Tape wheels in place with small pieces of removable tape positioned between the wheel and truck body—never on the tires themselves. Close all doors and hatches, securing them with temporary tape dots that won’t leave residue. For trucks with removable trailers, decide whether to wrap them separately or as one unit based on connection stability.
Remove Accessories Strategically
Detach cargo containers, figures, or accessories that would create protrusions. Wrap these separately using standard techniques, then tie them to the main package with ribbon. Label small packages “For Truck” to ensure they stay together. This approach creates cleaner lines while preserving all components.
Clean and Dry the Surface
Wipe the entire truck with a dry microfiber cloth to remove dust and oils that could transfer to your paper. Pay special attention to wheel wells and undercarriages where debris collects. Ensure the surface is completely dry—moisture causes paper to warp and tape to fail.
Basic Wrapping Technique for Toy Trucks

Follow this systematic approach to wrap most standard toy trucks successfully on your first attempt.
Position the Truck on Paper Correctly
Place wrapping paper face-down on a clean surface. Center the truck horizontally with the cab facing you. Ensure 6-8 inches of paper extends beyond the truck on all sides. For trucks longer than 10 inches, add 2 extra inches of paper on each end to accommodate folding.
Wrap the Main Body First
Bring the long sides up and over the truck’s main body, meeting at the top center. Secure this seam underneath the truck with small, hidden tape pieces every 2 inches. Don’t pull tight—allow slight slack for contouring around wheels. The paper should form a smooth tent over the cab without wrinkles.
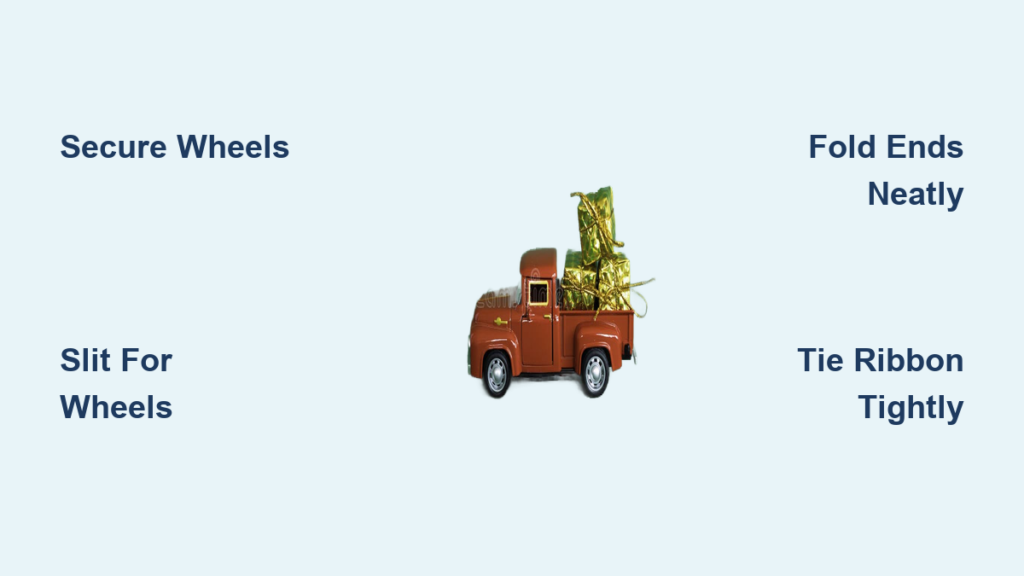
Create End Folds at Cab and Trailer
At the cab end, fold the excess paper down over the front face. Create diagonal folds from the bottom corners up toward the center, forming neat triangular flaps. Tuck these under the sides and secure with tiny tape dots. Repeat at the trailer end, adjusting for any differences in shape.
Manage Wheel Areas with Precision
For each wheel, make a small vertical slit in the paper just large enough to accommodate the wheel’s position. Gently work the paper around the wheel, creating three to four small pleats underneath where they won’t show. Secure pleats with minuscule tape dots—never tape the wheel itself. The paper should lie flat between wheels with no visible tension points.
Alternative Wrapping Methods for Problem Trucks
When standard techniques fail, these specialized approaches handle particularly challenging toy trucks.
The Fabric Wrap Method for Complex Trucks
Use a square cotton scarf (24″x24″) for trucks with excessive protrusions. Place the truck in the center, bring opposite corners together over the top, and tie securely. The fabric naturally conforms to irregular shapes while creating an attractive, reusable presentation. Choose holiday-patterned fabrics for seasonal gifts.
The Cardboard Sleeve Technique
Create a custom sleeve from lightweight cardboard cut to fit the truck’s profile. Slide the truck into the sleeve, then wrap the entire unit as a standard rectangular package. This method works especially well for trucks with rotating parts or delicate accessories that would complicate direct wrapping.
Add Professional Decorative Elements

Elevate your wrapped truck with these finishing touches that hide imperfections and create visual interest.
Strategic Ribbon Placement
Run ribbon along the truck’s length, crossing underneath and tying in a secure bow on top. Position the bow directly over the wheel area to conceal pleating work. Use 1.5-inch wide satin ribbon—it covers seams effectively while creating substantial bows. For trucks longer than 10 inches, add a second ribbon perpendicular to the first for balanced decoration.
Bow Creation That Lasts
Create full bows by forming eight loops (four on each side) with 18-inch ribbon lengths. Pinch the center tightly before securing with wire or thin string. Finish with 6-inch tails that you curl by running scissors along their back surfaces. Professional gift-wrappers always attach bows with wire rather than tape for durability during handling.
Troubleshoot Common Wrapping Problems
Fix these frequent issues without starting over:
Paper Tearing at Wheel Wells
Immediately stop pulling paper. Apply a small piece of matching washi tape over the tear on both sides. Continue wrapping, positioning the tear underneath where it won’t show. Prevention: Always make small slits before working paper around wheels rather than stretching the paper.
Uneven End Folds
Carefully unfold the problematic end. Re-fold using the truck’s geometry as your guide—match folds to the cab’s angles rather than creating perfect triangles. Secure with additional tape dots every inch along the seam. The goal is clean appearance, not mathematical precision.
Ribbon That Won’t Stay Put
Secure ribbon ends with small staples underneath the package rather than tape. The staple penetrates both paper layers, creating permanent adhesion. Cover staple points with a small decorative sticker or gift tag for a polished finish.
Store Wrapped Gifts Properly Until Gifting
Protect your careful work with these storage techniques:
Place wrapped trucks in open-top boxes slightly larger than the gift. Fill empty space with shredded paper to prevent shifting. Store boxes upright (never stack them) in a closet with stable temperature. Check packages weekly for loose elements, re-securing any ribbon or bows that have shifted. For gifts traveling long distances, place the entire wrapped package in a plastic gift bag to prevent snags during transit.
Mastering how to wrap a toy truck transforms a frustrating task into a satisfying craft that makes your gift stand out. By following these specific techniques—proper preparation, strategic paper management around wheels, and professional finishing touches—you’ll create wrapped gifts that build excitement before the box is even opened. Remember that perfect wrapping isn’t about flawless execution but creating an attractive presentation that shows thoughtfulness. With practice, you’ll wrap toy trucks faster than standard boxes, impressing recipients with your attention to detail. When your beautifully wrapped truck appears under the tree, the extra effort will be evident in the delighted reaction when it’s unwrapped. Start with these techniques for your next gift, and you’ll never dread wrapping irregularly shaped toys again.