
Your child’s favorite toy car has broken down again – the engine won’t turn, the wheels are stuck, or some tiny part has gone missing. As a parent, you know these moments present the perfect opportunity to teach valuable skills while keeping your child engaged. A quality toy car engine repair set transforms frustrating breakdowns into exciting learning experiences where children can diagnose problems, develop fine motor skills, and experience the satisfaction of fixing something with their own hands. This guide reveals exactly what to look for in a toy car engine repair set and how to maximize its educational value without turning playtime into frustration.
What Makes a Toy Car Engine Repair Set Actually Usable
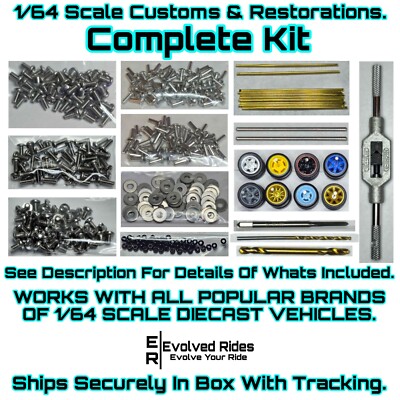
Essential Components Every Quality Set Must Include
A functional toy car engine repair set needs specific components that match children’s capabilities while maintaining educational value. The core must include miniature but durable tools scaled appropriately for small hands – think plastic or rubber-coated screwdrivers with magnetic tips to prevent tiny screws from disappearing into carpet. Look for sets with oversized bolts and nuts that won’t get lost easily but still teach proper fastening techniques. The best sets incorporate visual indicators like color-coded parts or numbered assembly sequences that guide children through the repair process without constant adult supervision.
Why Material Quality Determines Longevity
Cheap plastic tools that snap after two uses defeat the entire purpose of a repair set. Durable ABS plastic construction withstands repeated use while maintaining functionality. The metal components should be stainless steel or zinc alloy that won’t rust when stored in a toy box. Check that screwdriver tips match the screw types in common toy cars – Phillips and flathead are essential, while hex and Torx heads accommodate more advanced toy vehicles. Sets with storage cases featuring molded compartments prevent parts from getting lost and teach organizational skills.
Age-Appropriate Complexity Levels Explained
Toy car repair sets fail when they’re either too simple to be engaging or too complex to be manageable. For ages 3-5, look for sets with large, chunky tools and simple snap-together engines requiring no small parts. Ages 6-8 need functional tools that work on actual toy cars with visible internal components. For children 9 and older, consider sets with working pistons, removable cylinders, and gear mechanisms that demonstrate real engine principles. The sweet spot is sets that grow with your child – starting with basic assembly and progressing to more complex repairs as skills develop.
How to Match Repair Sets to Your Child’s Specific Toy Cars
Identifying Compatible Toy Vehicle Brands
Not all toy car engine repair sets work with every brand. Match the set to your child’s most-played-with vehicles. For Hot Wheels collectors, seek sets with ultra-fine tools for tiny components. For larger die-cast models like Matchbox or Johnny Lightning, look for standard-sized miniature tools. If your child plays with plastic toy cars from brands like Fisher-Price or Little Tikes, choose sets with oversized, chunky tools designed for those specific models. The best sets include compatibility charts showing which toy brands their tools can service.
Troubleshooting Common Toy Engine Problems
Before purchasing a repair set, identify the specific issues your child’s toy cars face. If wheels frequently fall off, prioritize sets with wheel axle tools and replacement parts. For engines that won’t turn, look for sets with gear alignment tools and replacement gears. When doors or hoods won’t stay closed, choose sets with miniature latches and hinges. The most versatile sets include diagnostic cards that help children identify common problems and select the right tools – turning repair into a logical problem-solving process rather than random tinkering.
When to Upgrade From Basic to Advanced Sets
Your child has mastered changing wheels and now wants to understand why engines work. This progression signals it’s time for an advanced set. Look for models with transparent engine casings that reveal internal mechanics, piston systems that actually move when cranked, and color-coded components that demonstrate engine cycles. Advanced sets often include activity guides with challenges like “Fix the misfiring cylinder” or “Adjust the timing belt,” transforming play into structured learning. The transition should happen when your child starts asking “how” questions about how engines work rather than just wanting to “fix” broken parts.
Maximizing Educational Value Through Play
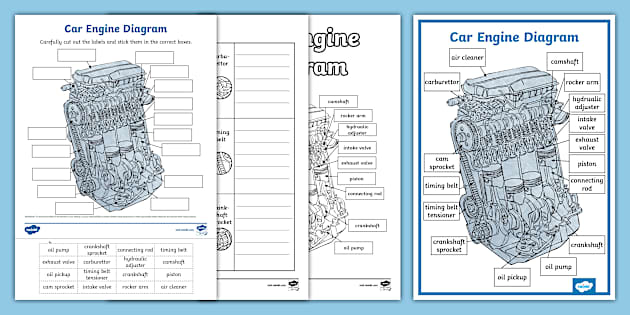
Turning Repairs Into Learning Opportunities
A toy car engine repair set becomes educational when you guide your child through the thinking process, not just the physical repair. Ask questions like “What do you think made this part break?” or “How would you prevent this from happening again?” Encourage them to draw diagrams of the engine before disassembly. Create a simple logbook where they record what they fixed and how long it took. These practices develop critical thinking and documentation skills that extend far beyond toy repair.
Common Mistakes That Turn Learning Into Frustration
Forcing unrealistic expectations creates negative associations with mechanical work. Never expect a 5-year-old to rebuild an entire engine in one sitting. Don’t insist on perfect reassembly when exploration is the goal. Avoid taking over when they struggle – instead, break the task into smaller steps. Most importantly, don’t treat repair time as punishment for breaking toys. The most successful parents frame repair sessions as special bonding time: “I’m excited we get to work on this together!”
Creating a Dedicated Repair Station at Home
Designate a specific area for toy repairs with appropriate tools and organization. Use a small plastic bin with compartments for different tool types. Add a magnifying glass for examining tiny parts. Include a soft mat to prevent small components from rolling away. Post a simple flowchart on the wall: “1. Identify problem 2. Choose tools 3. Try fix 4. Test 5. Celebrate!” This dedicated space signals that repair work is valuable and respected, encouraging your child to approach problems methodically.
Safety Considerations Every Parent Must Know

Age-Appropriate Safety Features to Verify
Check that all tools have rounded, non-sharp edges even on metal components. Verify that small parts meet current safety standards for your child’s age group. The best sets include visual warnings on tools that might pinch fingers during use. For younger children, look for sets with tools that can’t actually tighten screws completely, preventing over-tightening that could damage toys. Always supervise initial use to ensure proper handling techniques.
Storage Solutions That Prevent Accidents
The biggest safety hazard with toy repair sets is improper storage. Loose small parts become choking hazards. Tools left on the floor cause tripping accidents. Choose sets with storage cases that have secure latches children can operate but won’t open accidentally. Teach your child to do a “parts count” before putting everything away to ensure nothing gets left behind. Store the complete set on a high shelf when not in use, treating it with the same care as real tools.
When to Intervene During Repair Sessions
Watch for frustration signals like clenched jaws, rapid breathing, or throwing parts. These indicate it’s time to pause the session. If your child is forcing tools where they don’t fit, gently redirect to proper technique. Never allow attempts to repair battery compartments or electrical components in toy cars. The best approach is “I see you’re working hard on that bolt. Let’s take a break and try again after snack time” rather than taking over completely.
Making the Most of Your Investment
Extending Play Value Through Creative Challenges
Transform routine repairs into engaging challenges. Create a “repair shop” scenario where your child fixes cars for stuffed animal customers. Time simple repairs to track improvement in speed and accuracy. Introduce “mystery problems” where you secretly create an issue for them to diagnose. The most engaged children develop their own challenges once they’ve mastered basic repairs.
When to Add Specialty Tools to the Basic Set
As skills develop, consider adding specific tools that match your child’s interests. If they love race cars, add tire-changing tools. For construction vehicle fans, include miniature hydraulic components. The key is letting your child choose the next tool based on what they want to fix, not what you think they should learn. A single specialty tool added every few months maintains excitement without overwhelming them.
Repair Sets That Grow Into Real Mechanical Skills
The ultimate value of a toy car engine repair set is how it builds foundations for real-world skills. Children who master toy repairs develop spatial reasoning, fine motor control, and problem-solving approaches that transfer directly to real mechanical work. Many parents report their children showing greater interest in science and engineering after regular play with quality repair sets. The most successful sets include parent guides explaining how each activity connects to real mechanical principles.
Final Note: A well-chosen toy car engine repair set provides far more than temporary entertainment – it builds foundational skills while transforming breakdowns into bonding opportunities. The right set matches your child’s current abilities while offering pathways to more advanced skills, all within safe, age-appropriate parameters. By selecting carefully and engaging thoughtfully in the repair process, you’re not just fixing toy cars; you’re helping build a young mechanic’s confidence, curiosity, and capability that will serve them well beyond the playroom. When your child proudly declares “I fixed it myself!” after solving a mechanical problem, you’ll know you’ve invested in something far more valuable than just another toy.